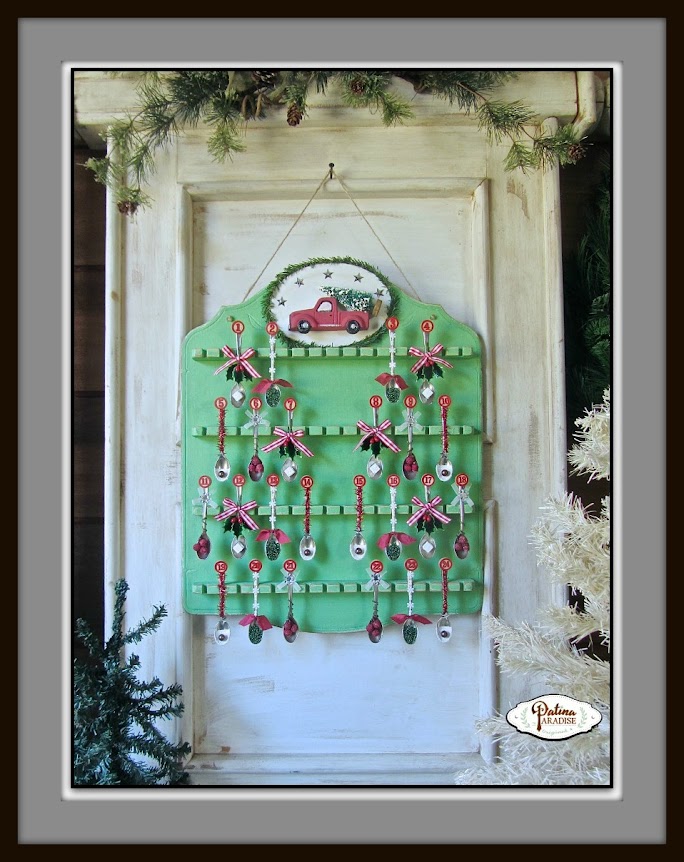
After years of wanting to create a one of a kind Advent Calendar for my munchkin I am so happy to finally have one ahead of the season. When I spotted two of these spoon racks at the thrift store
a few years ago I knew that I could transform them into something. Then I discovered small silver spoons at the dollar store and the idea of using the two together was born. To finish it just as I had envisioned, I had the pleasure of using one of my favorite paints:
"Black Dog Salvage Furniture Paint" and other
Woodcraft products...
What you will need for this project...
* I was compensated with product in order to create this project. (This is a sponsored post but all opinions are 100% my own).
Steps...
1) Lightly sand your spoon rack and wipe clean. You can use wood filler to fill in the engraved pattern. Since I knew that I was going to cover it with something, I didn't bother with this step.
2) Mix together 50% "Go Green", 40% "Clean Canvas" and 10% "Patino Greenio" to get a vintage green color. Brush on 2 coats of paint waiting an hour in between coats. Lightly sand edges where natural wear would occur.
3) Decide on a topper for your advent calendar and add it on. Use wire or jute to hang it with.
For my topper I used a shiny plastic ornament that I found at Walmart. (Unfortunately I forgot to take a before shot and they no longer had any in stock). My hubby cut it in half lengthwise so that it would lay flat. Since I love patina, I painted over the shiny red with some Black Dog Salvage Furniture Paint in "I need a Bandage" red to give it an older look. Behind the truck is a thin wood oval plaque also found at Walmart. I painted it with "Clean Canvas" white and added some faux greenery to the edge and some silver stars for added interest. The vintage bottle brush tree was from my stash. I used hot glue to adhere everything together.
What you will need for the spoons and to add to the rack...
- "Dollar Tree" silver mini plastic spoons from the wedding section (24 pk)
- Black Dog Salvage "Guard Dog Topcoat" (for antiquing the spoons)
- General Finishes "Van Dyke Brown" Glaze Effects (for antiquing the spoons)
- Miniature clothespins for the back of the spoons (1" x 1/4" x 1/8")
- Various ribbons and berries and beads
- Tim Holz Ideology Game Pieces (for numbers)
- Plastic truck ornament and bottle brush tree (optional)
- Hot glue and hot glue gun
To antique the spoons you will need a teaspoon of General Finishes Van Dyke Brown Glaze and a teaspoon of Guard Dog Top Coat. (I discovered that they both need to be done together otherwise the glaze wipes off when you go to brush on a topcoat or when you handle it with your fingers). You can can create the finish of your choice, B, C, or D by following the instructions below...
A) Using hot glue attach the mini clothespins to the back of the spoons about 3/4 of an inch down from the top with the open end facing down. This will help the spoons rest higher on the spoon rack and give you a way to hang the ornaments on the tree. Gluing it on before adding the glaze gives the hot glue a better chance to bond the two together. B) Using a soft rounded end brush and holding the end of the spoon handle with your fingers, brush a thin coat of the glaze mixture onto the spoons. You need very little on the brush so if it is too much, blot the excess onto a piece of paper towel. Then brush it onto the spoon. Try to avoid brush marks from excess. C) If you want to add more antiquing let the spoons dry for about an hour, then brush on a second coat. D) If you want them to look authentically old and tarnished you can continue by adding some brown spots to the spoons. I did this by loading the brush with the mix and using the wood end of another brush to splatter a fine mist of the glaze onto the spoons. At this point I think they look pretty realistic don't you?
* You will note that the tip of the spoon has no antiquing glaze since I knew that I would be adding wooden numbers there and it also gave me something to hold on to while antiquing them.
These are the 4 designs that I ended up with and repeated. Since the bows take up so much space, I made sure to vary their position and size. Most of the supplies were brought from Hobby Lobby and Walmart. Here's what you will need for each one...
- Gingham ribbon, holly berry pick and faux sugar cube (see directions below)
- Mini snowflake garland, red seam binding, green seed beads glued in place with mod podge
- Berry pick, white semitransparent ribbon and silver snowflake
- Red tinsel ribbon, silver star, white paint and glitter, shiny brown bead
To make your own sugar cubes take your 3/8 of an inch wooden cubes and use the white "Clean Canvas" to paint 5 of their sides then immediately roll in some glitter. (The unpainted side will be the one you glue onto the spoon). Let them dry and use hot glue to adhere them in place.
Once you are happy with the placement of the different designs, add your wooden numbers. You can purchase them
HERE. Other options for numbers: print your own on thick card stock and cut them out or buy tiny tags and write down the numbers on them.
When putting the spoons on the rack make sure to gently place them in the slots down to the point where the clothespin slides in snug.
Since the bows add width to the spoons, use every other spot to place your spoons on and stagger the position of those underneath. I personally like symmetry, so I made sure that the left side and the right side mirrored each other in the placement of the 4 different designs.
On December 1st your munchkin or munchkins can begin hanging an ornament a day on a tree of their choice. I think the spoon ornaments would look great on a small Christmas tree in the kitchen.
I also painted one of the spoon racks in an off white created by mixing
Black Dog Salvage Furniture Paint in equal parts of "Clean Canvas" and "Dog Bone". The star with the bird is a Christmas ornament also found at Walmart. I think I will make some shabby chic spoon designs to go with it, although I think the same 4 designs look great on it. Which one is your favorite, the green or antique white?
The next time you spot one of these spoon racks, don't let it pass you by and perhaps consider turning it into an advent calendar for your munchkins.
Blessings,
Lucy
Read more »